Knowledge & Library Hub Service Desk

Login Sign up

How do I merge my EBSCO personal user accounts?

Modified on: Tue, 10 Jun 2025 14:42

The EBSCO Merge Accounts feature allows you to merge account information (saved articles, searches, alerts, videos, etc.) from one Personal User Account into another. Once your accounts are merged, the account that contained the data that was merged into the target account is removed and no longer exists on the service. 


With single sign on you will not have a separate login for your MyEBSCO space.  Please note not all features can be merged once we are on the new interface - see this EBSCO Connect article


To merge your personal user accounts: 


1. Ensure you are logged into the Knowledge and Library Hub with your new account. (This new account is the one you would like to keep after bringing in data from a previous account.) 

2. Click the Update My Account link in the top toolbar. Note: For security purposes, you will be required to sign in again. 


Screenshot of the Knowledge and Library Hub front page, with an arrow pointing to the Update My Account link in the top right hand corner 


3. Click the Get Started button for the EBSCO Merge Accounts option. Please note: your email address will read as "changeme@ebsco.com" because your email is not being passed by OpenAthens. 


Screenshot of the My Account box, highlighting the Currently signed in as changeme@ebsco.com and with an arrow pointing to the Get Started link under Merge accounts 


4. Click the Sign in to your second account button. 


Screenshot of the Merge Accounts box showing a button labelled "Sign in to your second account" at the bottom 


5. Enter the username and password for the second Personal User account (the account that has the data you wish to move into your new account).


Screenshot of the login box for the second account 


6. Confirm the accounts you are merging are correct and click the Merge Account Data button. 


Screenshot of the Merge Account confirmation page, showing a second account with folders, ebooks, journals etc being merged into a new account. The Merge account data button is highlighted at the bottom 


7. Click Continue to confirm you wish to continue with the merge of your accounts. 


Note: Once you click to merge accounts, this action cannot be undone. 


Screenshot of the "Continue with merge?" dialogue box, with the Continue button highlighted. The dialogue box gives the email address for the account which will be deleted. 


NoteOrdinarily if your account is associated with a deliverable email address you will receive an email when your accounts have been successfully merged. However, under NHS standards, your email address is not being passed & stored, so you will not receive an email. 

Please rest assured your content will be available in the target account shortly. 


Troubleshooting 


Accounts cannot be merged at this time

The following conditions will prevent you from merging your accounts until they are resolved.

  • The account you are merging has pending or existing Continuing Medical Education credits (*such as DynaMed). See the Save option for these accounts below. 
  • The account you are merging has an eBook or Audiobook checked out. You will need to check in any checked out eBook or Audiobook titles in order to merge your accounts.


Merge Account Alert 

The following conditions will not prevent you from merging your accounts, but they may cause some items not to be merged into the target folder:

  • The folders being merged were created while logged into different institutional accounts. Because available content may differ between institutions, only the content in the folder to be merged that is available from the institution through which the target account was created will be merged.
  • The account to be merged has a role assigned to it, such as a Nursing Reference Center Plus administrator role used to create and edit notes on articles. If you continue to merge this account into the target account, that role will not be carried over.
  • The account to be merged has active holds on EBSCO eBooks or Audiobooks. You can continue merging the accounts, but those holds will be deleted and not merged to the target account.


Save option for accounts that cannot be merged (including DynaMed personal folders):

If you are unable to merge your old personal folder/account with your new folder/account, you can use the following steps to manually save the contents of your old personal folder and then add them to your new folder:

1. Log into your old personal folder by clicking on Switch Accounts (detailed instructions on how to do this can be found here: https://connect.ebsco.com/s/article/How-can-I-switch-accounts-when-logged-into-EBSCO-Discovery-Service-via-Single-Sign-On)


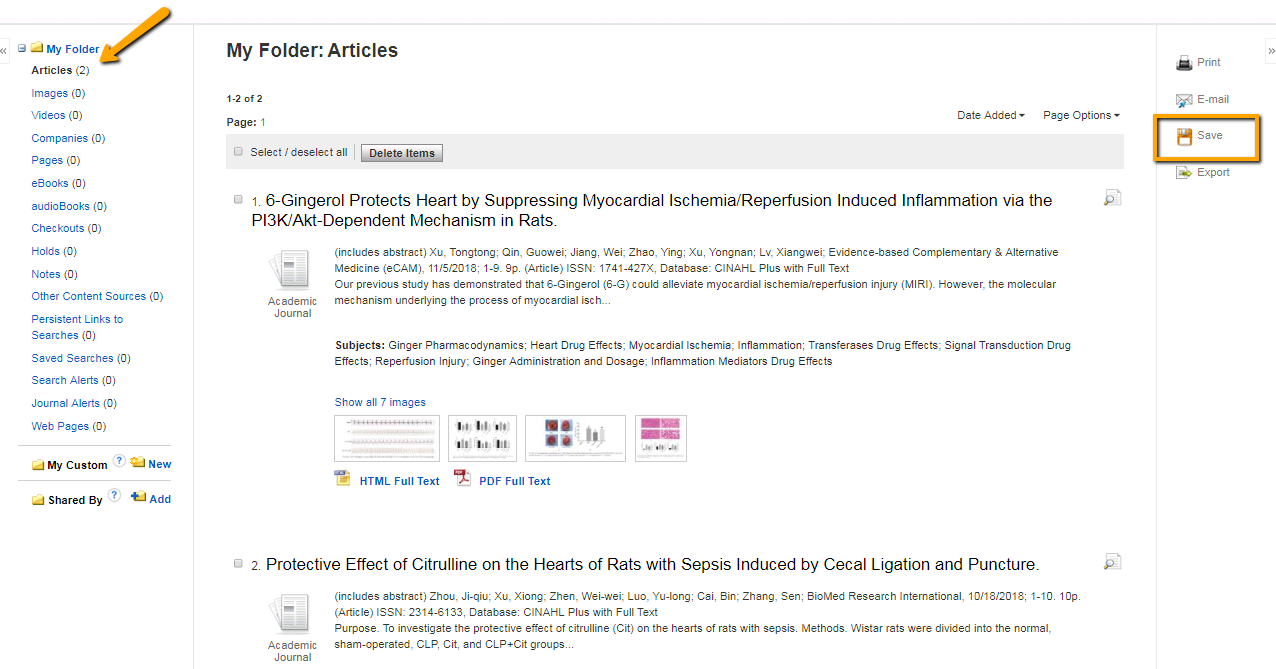
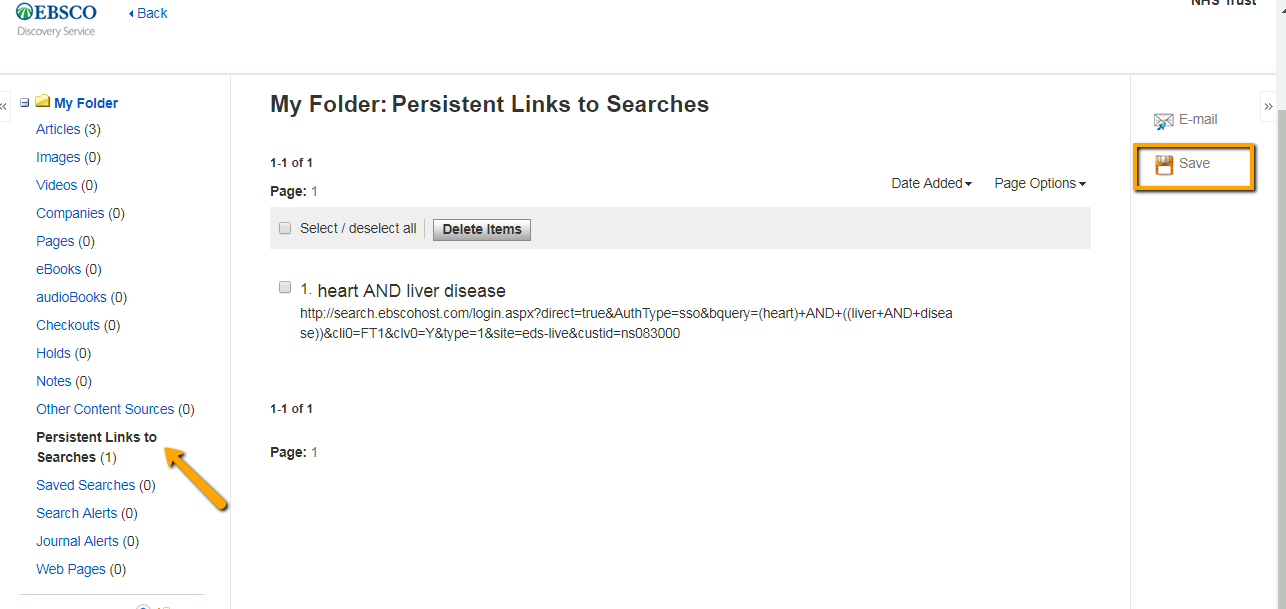
2. Once in your old personal folder you will need to click “Savefor each subfolder (Articles, Images, eBooks, Notes, etc.) that has content that you want to add to your new EBSCO Personal Folder:

Graphical user interface, text, application, emailDescription automatically generated

Screenshot of the Persistent Links to Searches subfolder under My Folder, with the Save button circled on the right of the screen

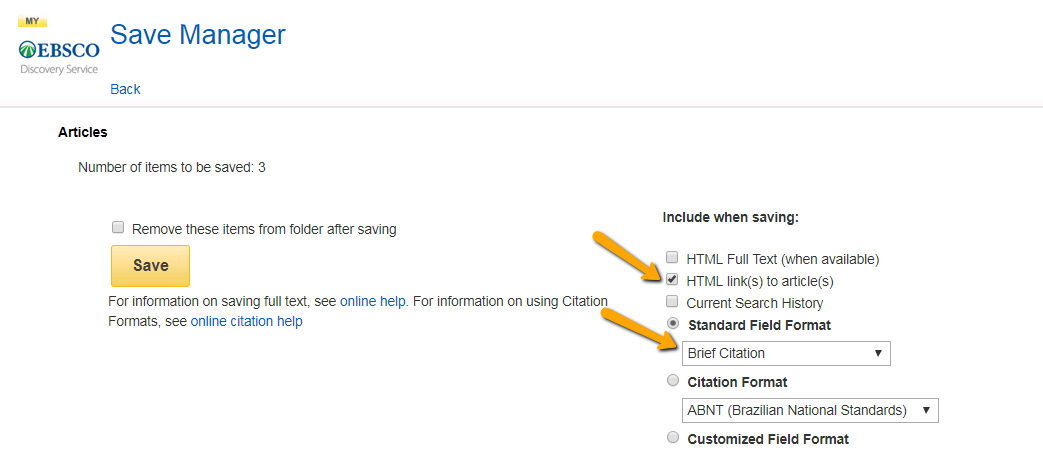
3. Make sure the following settings are selected (when available):

  • Include “HTML Link(s) to article(s)”  
  • Standard Field Format: “Brief Citation”

Screenshot of the Save Manager screen, with arrows pointing to the options "HTML link(s) to article(s)" and the dropdown box Standard Field Format, the second and fourth options under Include when saving:

4. You will then be taken to a window with record information on each item in the subfolder being saved that contains links to the records/saved searches etc. and instructions on how to save the information as a file on your computer.

For Articles subfolder:

Screenshot of the Articles subfolder with instructions (listed below) on how to save a file containing this information.

For Saved Searches subfolder:

Screenshot of the Saved Searches subfolder with instructions (listed below) on how to save a file containing this information.

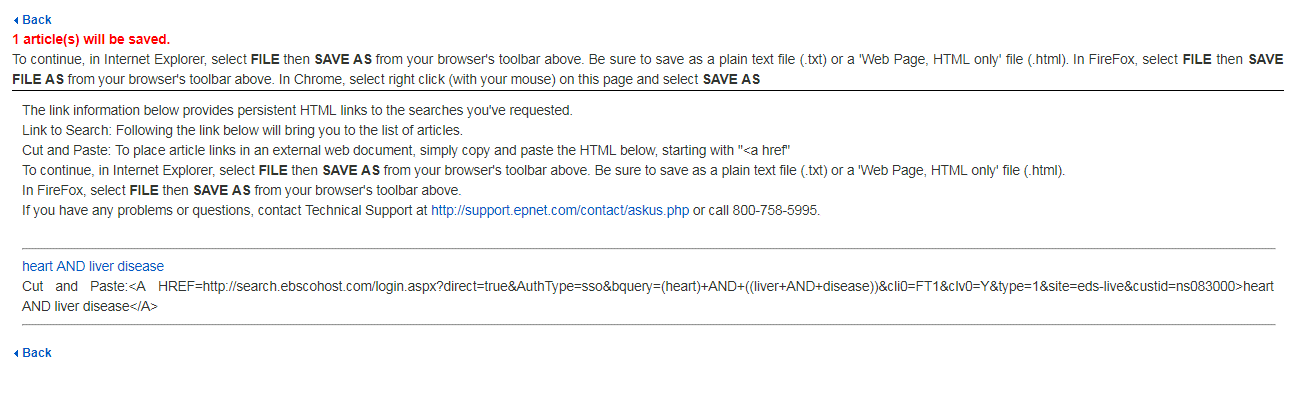
To save the information in:

  • Internet Explorer: select FILE then SAVE AS from your browser's toolbar. Be sure to save as a plain text file (.txt) or a 'Web Page, HTML only' file (.html). 
  • FireFox: select FILE then SAVE FILE AS from your browser's toolbar.
  • Chrome: right click (with your mouse) on this page and select SAVE AS

You will need to repeat this for each subfolder which has information you want to add to the new folder.


5. Log out of your old Personal Folder.

You can now add the content you saved back into your new personal folder by logging into the new folder, opening each link in the saved file(s) and selecting Add to Folder.

Was this answer helpful?